Introduction
A 5-Day AI Agents Intensive Course with Google was launched sometime last month. However, due to ongoing assignments and exams, I was unable to participate in the live event. Now that I have gotten the opportunity to do so, I started with day 1 today, and wanted to share my learnings!
What did this day cover
Day 1 was a great introduction to AI agents. I am already familiar with artificial intelligence and its underlying theoretical concepts. However, the reading for today was a comprehensive yet simple introduction to what AI agents are, what the different components of an agent are, and how they work together. Finally, there were two hands on Kaggle notebooks, one for a single agent, another for multi agent, which was very useful!
We used Agent Development Kit along with Gemini. The API Key can be generated on aistudio.
Reading: Introduction to Agents
In this section, I aim to summarise some of my key takeaways from today's reading. Note that this is just a few of the points from the reading!
The different layers of an autonomous system
An autonomous system consists of a few essential layers -
-
The Brain: This is the LLM itself, which is the one which generates the actual information.
-
The Hands: These are the tools which the LLM is able to use in order to carry out the necessary actions.
-
The Nervous System: This is the process that manages the agent execution loop. For example, the steps and the tools required are defined here.
-
The Body and Legs: This is the deployment process, where users can actually access the agent through a UI. Moreover, even agents can access each other through the Agent-to-Agent API.
The main steps to solve a problem
As defined in the reading, there are 5 main steps that an agent would carry out to solve a specific problem.
-
Get the mission: This is the high level goal, usually provided by the user. For example, "What is the trending topic in AI right now?"
-
Scan the environment: Here, the "nervous system" or the orchestration layer looks at the current environment. This can involve the data and the tools available to the agent.
-
Think: At this step, the agent analyses the step 1 and step 2, and creates a detailed plan on what it can do next. This is often a chain of reasoning which can involve some sequential steps.
-
Take Action: Here, the steps are executed, and the right tool is selected to execute the relevant step.
-
Observe and Continue: Here, the agent observes the outcome, stores it in memory if needed, and goes back to step3 to get the next step.
This is called the "Think, Act, Observe" cycle. Below, I have included the image taken from the reading:
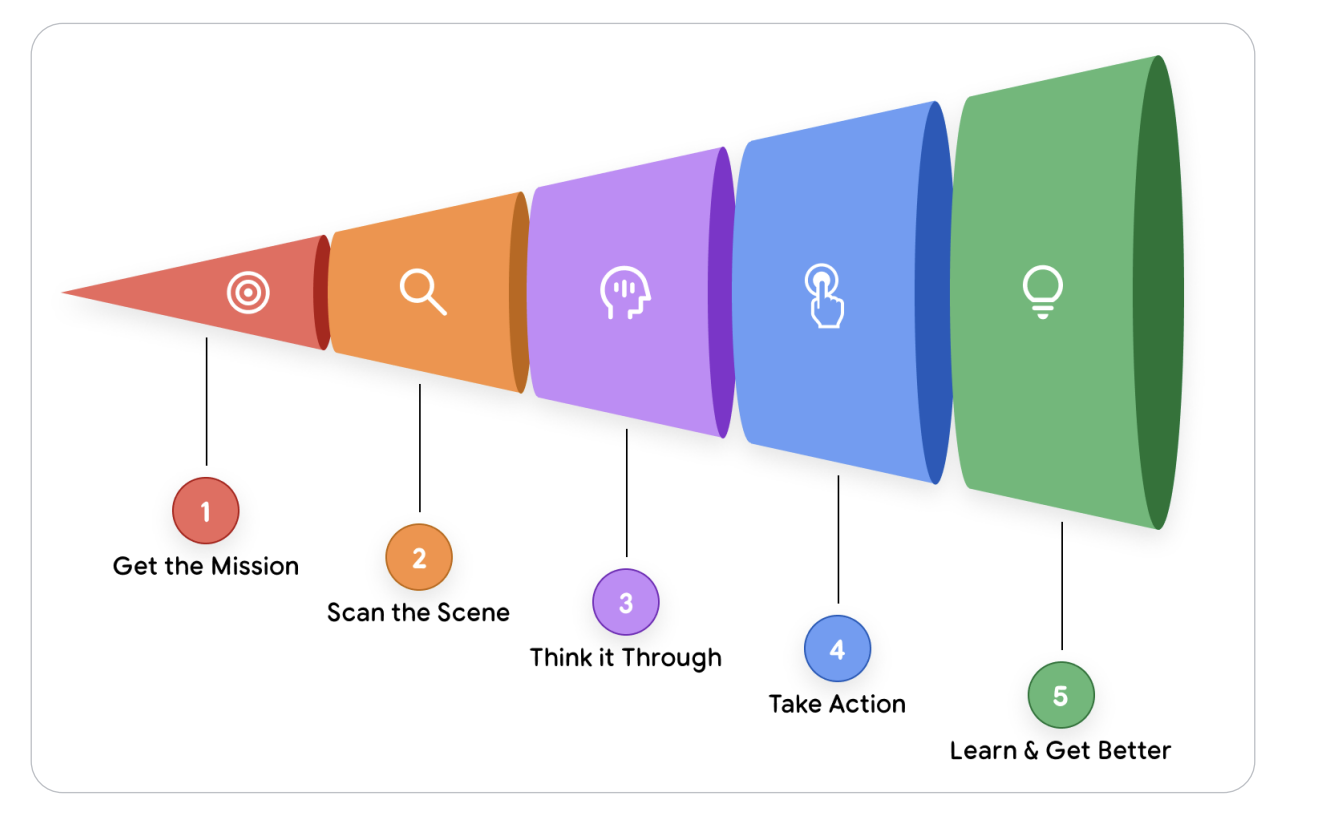 Agentic AI Problem Solving Process. Source: Introduction to Agents Reading
Taxonomy of Agent Systems
The main steps defined in the previous section can be scaled to various levels.
-
Level 0: The Core Reasoning System.
Here, the agent is simply the brain, that is, the model itself. Here, the agent can answer queries based on the data it has been trained on. It does not contain any tools or memory. As such, in order to have a good system, the training data must be quite extensive. Moreover, these systems cannot answer questions about real-time data.
-
Level 1: The Connected Problem-Solver.
Here, the reasoning system is extended to involve external tools. As such, it can now answer questions beyond its training data. This agent is now able to "interact with the world", be it through a search tool or Retrieval-Augmented Generation.
-
Level 2: The Strategic Problem Solver.
Here, the key improvement is that of context engineering. This involves strategic planning of the different steps that will be carried out by the agent.
-
Level 3: The Collaborative Multi-Agent System.
Here, we move away from a single agent, to multiple agents who work together. This can be analogous to a team of software engineers, including a frontend engineer, a backend engineer and a devops engineer. In this configuration, the agents treat each other as "tools". A "Manager" can create new missions for each of the specialised agents and orchestrate the workflow.
-
Level 4: The Self-Evolving System.
In this level, the agent is able to identify gaps and create new tools and agents to fill in these gaps. This turns our system into one which can greatly learn and evolve over time.
How to Test AI Agents
In traditional software engineering, we can define a set of deterministic test cases in order to determine if our code works as intended. However, in the context of AI Agents, due to their probabilistic nature, it becomes difficult to do so. Instead, we must shift to judging the quality of the LLM instead. One way to do so is to use a "Judge LM", which is a powerful model that can assess the output of the agent against the intended outcomes. We can also define evaluation scenarios, which can then be used to test the changes made to our development agent. Finally, human feedback is a crucial part of improving the agent. For example, a thumbs down on a specific output results in a new "test case" for our evaluation scenarios to consider in the future. By creating a test case for this scenario, the agent is able to ensure that this issue does not occur again.
There is More!
I only summarised some of the key concepts mentioned in the reading. The reading includes several topics, such as protocols, factors to consider while scaling an agent, and examples of advanced agents.
Kaggle Notebook 2: Multi-Agent System
Next, I want to share some of my learnings from the second notebook in this course, Build your first multi-agent systems using ADK.
The first notebook primarily served as an introduction to creating a single agent and connecting it to external tools.
In the second notebook, I got the opportunity to create my own multi-agent system. This notebook introduced the following concepts.
-
Creating several agents
-
Using the output from one agent in another agent (using the
output_key) -
Creating an orchestrator (coordinator) for this multi-agent system
I also learnt that we can have multiple types of workflows.
-
Sequential Workflow: Instead of relying on the sequence of steps based on the prompt, we can make the sequence deterministic by creating a
SequentialAgentand defining thesub_agentsin a specified order. -
Parallel Workflow: There might be instances when we multiple agents can run together, and do not rely on each other. This can be done by defining a
ParallelAgentand defining thesub_agents, which can be run concurrently. -
Combining the two workflows: We can combine different sequential and parallel workflows together under another agent. As such, the workflow can be as complex as needed, while ensuring each agent is managed in a modular manner.
-
Loop Workflow: Here, we can have a self-refinding workflow where a specific part of the workflow can loop until a specific condition is met. This can be defined by a
LoopAgent, which includes thesub_agentsto loop, and themax_iterationsto prevent an infinite loop. Thesub_agentcan also call anexit_loop function, which can result in breaking the loop before themax_iterationsare reached. A good example is provided in the kaggle notebook.
Below, I have included the decision tree from the notebook to decide the workflow pattern:
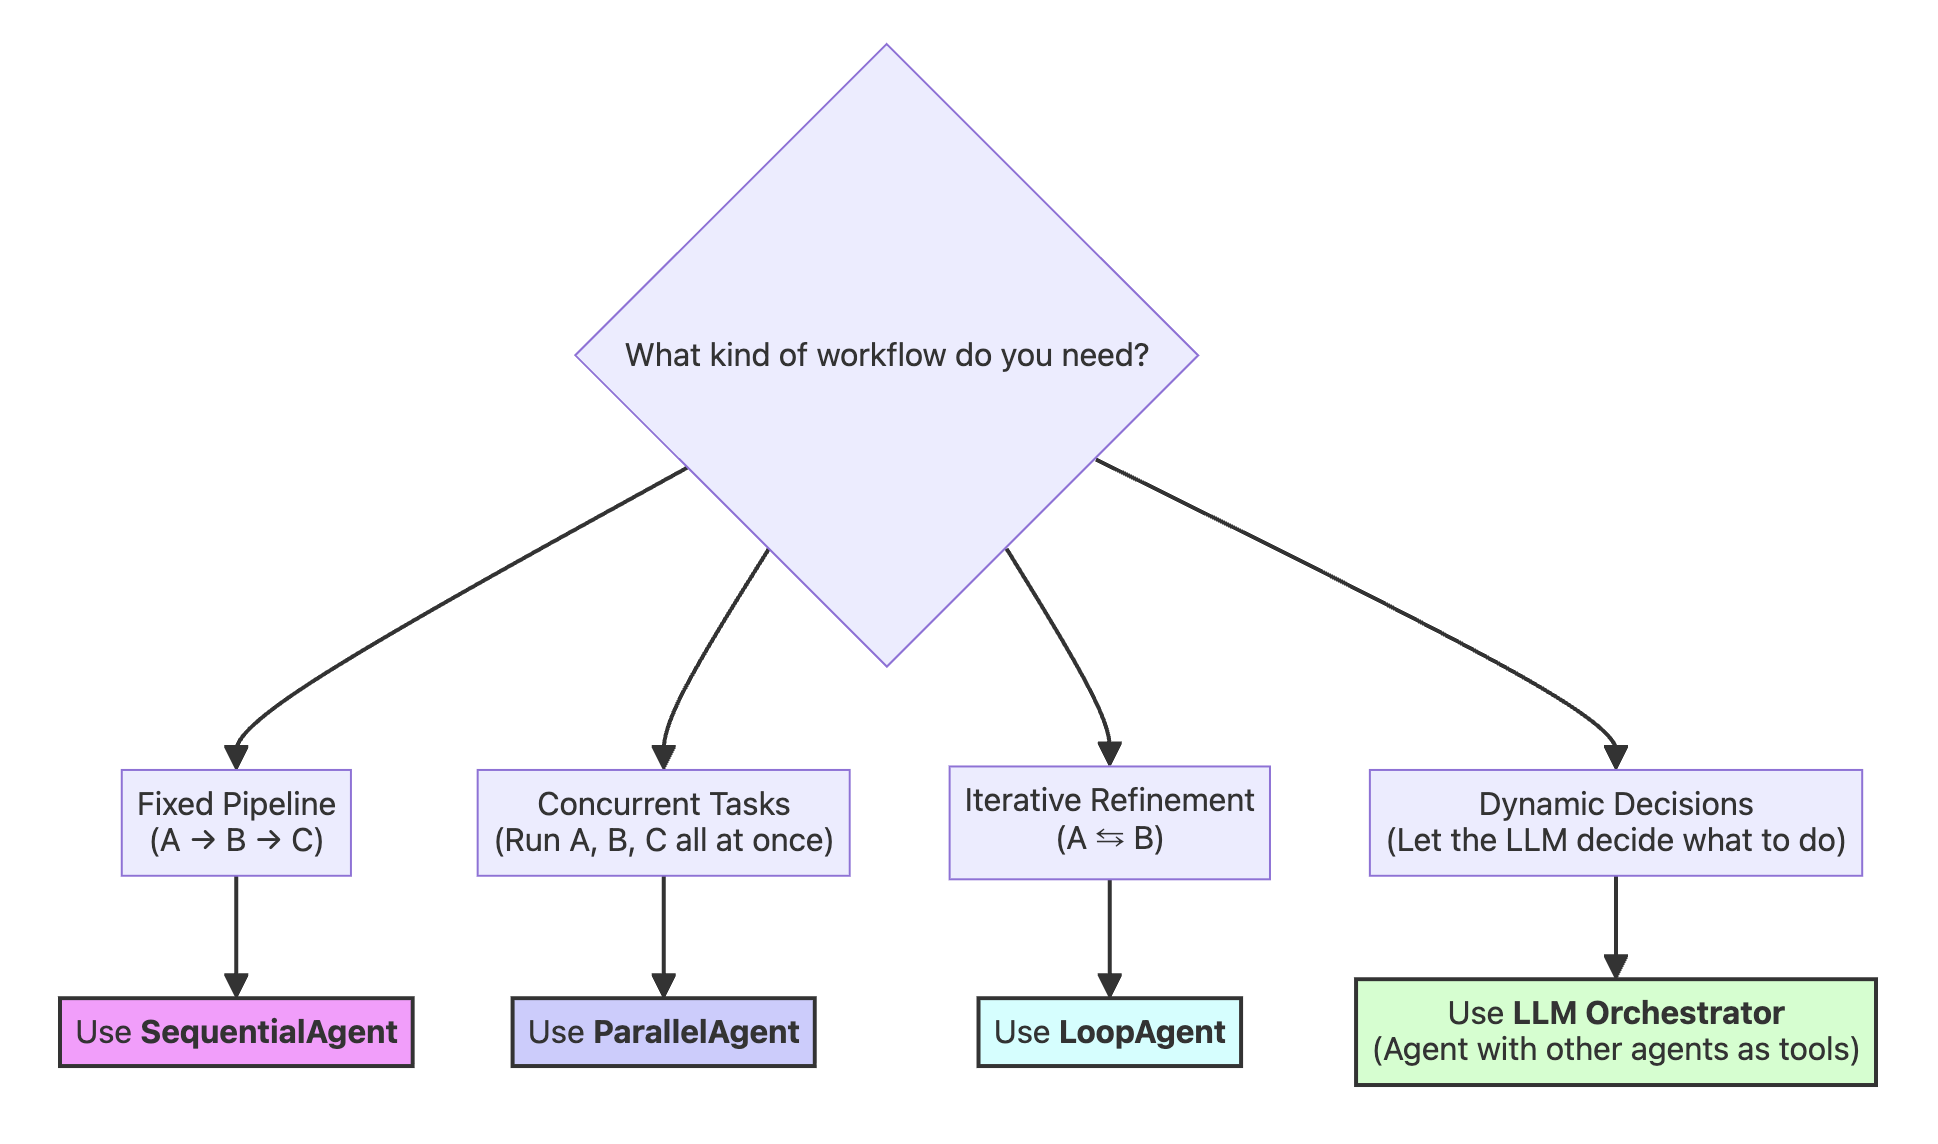 Workflow pattern. Source: Kaggle Notebook
Conclusion
This blog post was a summary of everything I learnt on Day 1. I would definitely recommend reading the entire reading as well as doing the course!
Excited for the coming days!
Thanks for reading!